Engaging in the art of pumpkin carving is a delightful and spirited pursuit, ideal for honoring the enchanting season of Halloween or autumnal festivities. The possibilities for crafting exquisite pumpkin carving design are limitless, ranging from traditional eerie visages to elaborate motifs and distinctive themes. Novices may begin with straightforward jack–o’-lantern faces, featuring triangular eyes and jagged mouths, while seasoned artisans can delve into intricate creations such as haunted mansions, fluttering bats, or beloved pop culture icons. For a contemporary flair, one might explore geometric patterns, floral arrangements, or utilize stencil kits for meticulous detailing. Enhancing the display with props, such as LED lights for a mesmerizing glow or integrating painted accents with carved features, can truly elevate the aesthetic. Whether the goal is to evoke fright, laughter, or artistic expression, pumpkin carving offers a splendid avenue for individuals to unleash their creativity and celebrate the season.

1.Traditional Spooky Face
Design: A quintessential Jack-o’-Lantern featuring sharp, jagged teeth, triangular eyes, and a sinister grin.
Step-by-Step:
Select Your Pumpkin: Opt for a medium to large pumpkin with a smooth, sturdy exterior. A rounded shape is ideal for traditional designs.
Cut the Lid: Employ a serrated knife to create a circular opening around the stem for the lid. Ensure the cut is angled to prevent the lid from falling inside the pumpkin.
Remove the Insides: Utilise a spoon or pumpkin scraper to extract all seeds and pulp. Clean the interior walls thoroughly for a polished surface.
Sketch the Face: Use a marker to outline the classic facial features: prominent triangular eyes, a broad, jagged mouth, and pointed teeth. Adjust the size of the teeth according to your preference.
Carve the Design: Begin with the eyes and mouth, using a small serrated carving tool for intricate edges. A linoleum cutter can be employed for finer details.
Illuminate: Place a tea light or LED candle inside and replace the lid. The flickering light will enhance the spookiness of the face.
Tip: For an added dramatic effect, carve the pumpkin from the bottom and position it on the ground to create a glowing appearance.
2.Haunted House Scene
Design: A chilling haunted house featuring slanted windows, bats, and a full moon.
Step-by-Step:
Choose a Large Pumpkin: This design requires ample space, making a larger pumpkin preferable.
Outline the House: Sketch a silhouette of a haunted house with slanted windows and a twisted tree. Include a full moon in the background for an ominous atmosphere.
Incorporate Details: Add smaller elements such as bats in the sky, a graveyard, or eerie tree branches. You may also include silhouettes of ghosts or owls.
Carve the Pumpkin: Utilise carving tools to cut out the house, tree, bats, and any additional features.
Illuminate: Insert a flickering LED candle within the pumpkin to create shadows that enhance the atmospheric quality of the scene.
Tip: To achieve a layered appearance, consider carving several pumpkins and arranging them in a stacked formation. For instance, position one pumpkin in the foreground to represent a haunted house and another in the background to symbolise the moon.
3.3D Carved Face
Design: A face that appears to be emerging from the pumpkin in a three-dimensional manner.
Step-by-Step:
Select a Pumpkin with a Broad Surface: Opt for a pumpkin that has a smooth exterior and a relatively uniform shape.
Sketch Your Design: Outline the face you intend to carve. A suitable choice could be a monstrous or ghastly visage featuring exaggerated characteristics, such as bulging eyes and pointed teeth.
Carve the Outline: Begin by cutting the general outline of the face. Utilise a large, serrated knife to establish the basic form.
Sculpt the Face in Layers: Rather than merely cutting through the pumpkin, gradually shave away layers of the skin to achieve a three-dimensional effect. Start with the most recessed features (like the eye sockets or mouth) and progressively work towards the more prominent areas of the face.
Incorporate Texture and Details: Employ tools such as a linoleum cutter or small knives to add intricate details, such as wrinkles or scars, to enhance the realism of the face.
Lighting: Position a battery-operated LED light inside the pumpkin to accentuate the 3D effect. The shadows cast by the carved face will contribute to a more eerie appearance.
Tip: For a more striking effect, consider carving certain sections so that the pumpkin’s flesh is only partially removed, leaving translucent areas that emit a glow when illuminated.
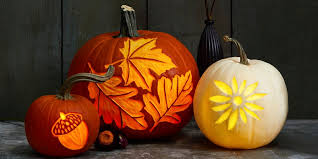
4.Spider Web Pumpkin
Design: A finely detailed spider web carved into the pumpkin’s surface, featuring a spider suspended in the centre.
Step-by-Step:
Select a Pumpkin: Choose a round or slightly oval pumpkin with a smooth exterior.
Sketch the Web: Use a marker to outline a spider web design on the front of the pumpkin, ensuring that the web radiates outward from the centre.
Carving the Web: Utilise a small, precise carving tool to delicately create the web design. You may choose to make the web as detailed as desired, but ensure that the cuts remain shallow to maintain the structural integrity of the pumpkin.
Crafting the Spider: In the middle of the web, carve a diminutive spider. Employ a sharp instrument to define its body and legs.
Finishing Touches: To enhance the spooky effect, consider applying glow-in-the-dark paint to either the web or the spider.
Illumination: Position a light source within the pumpkin to illuminate the web, producing a haunting and atmospheric glow.
Suggestion: For an added twist, you can create the effect of a spider emerging from the web by carving it in a way that it appears to “pop out” slightly from the surface of the pumpkin.
5.Frankenstein’s Monster Pumpkin
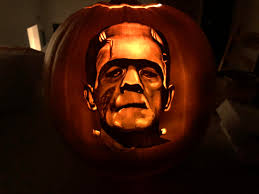
Concept: A stylized representation of Frankenstein’s monster featuring bolts on the sides of the head and a square-shaped forehead.
Step-by-Step Instructions:
Select a Pumpkin: Opt for a pumpkin with a smooth exterior. A tall and elongated pumpkin will enhance the appearance of the square forehead.
Sketch Frankenstein’s Face: Outline a prominent square forehead with short hair at the top. Include the recognizable bolts on either side of the pumpkin (near the top) and a large, square mouth with stitched lips.
Carve the Features: Carefully remove the material for the eyes, nose, mouth, and bolts. Utilise a small knife for the eyes and a serrated knife for the mouth.
Detail the Stitches: For the stitched mouth, use a small, sharp knife to create short lines across the mouth area, simulating stitches.
Add Hair: For the hair, you may carve a rough, spiky texture or add details to replicate hair.
Illuminate: A tea light or LED candle placed inside will animate Frankenstein’s face.
Suggestion: To enhance the appearance of the bolts, consider inserting actual metallic bolts into the pumpkin for a more realistic effect.
6.Pumpkin Stack (Totem Style)
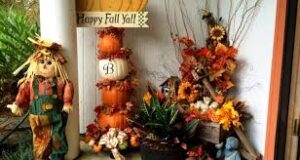
Design: Arrange several pumpkins vertically to form a totem-like figure, such as a pumpkin snowman or a spooky tower.
Step-by-Step:
Select Three to Four Pumpkins: Choose pumpkins of different sizes, ensuring. The largest is at the base and the smallest at the top.
Create Flat Bases: Cut the bottoms of each pumpkin to establish a stable, flat surface for stacking. Ensure that each hole fits securely onto the pumpkin below.
Carve Unique Faces or Patterns: Consider carving distinct faces on each pumpkin for added variety, or design the top pumpkin with a frightening expression while the others represent the body.
Assemble the Pumpkins: Carefully position the pumpkins on top of one another. If needed, use toothpicks or wooden dowels to stabilise the structure.
Add Illumination: Place a candle or LED light inside each pumpkin, particularly for evening displays.
Suggestion: For an enhanced eerie effect, carve eyes that appear to gaze at the other pumpkins, creating the illusion of a connected, supernatural entity.
Summary
These concepts vary in complexity, allowing you to select a design that aligns with your skill level and available time. Enjoy the carving experience and have a delightful time crafting a spooky or whimsical Halloween display!